Qt QML
This section covers the important concepts needed for Qt/QML programming.
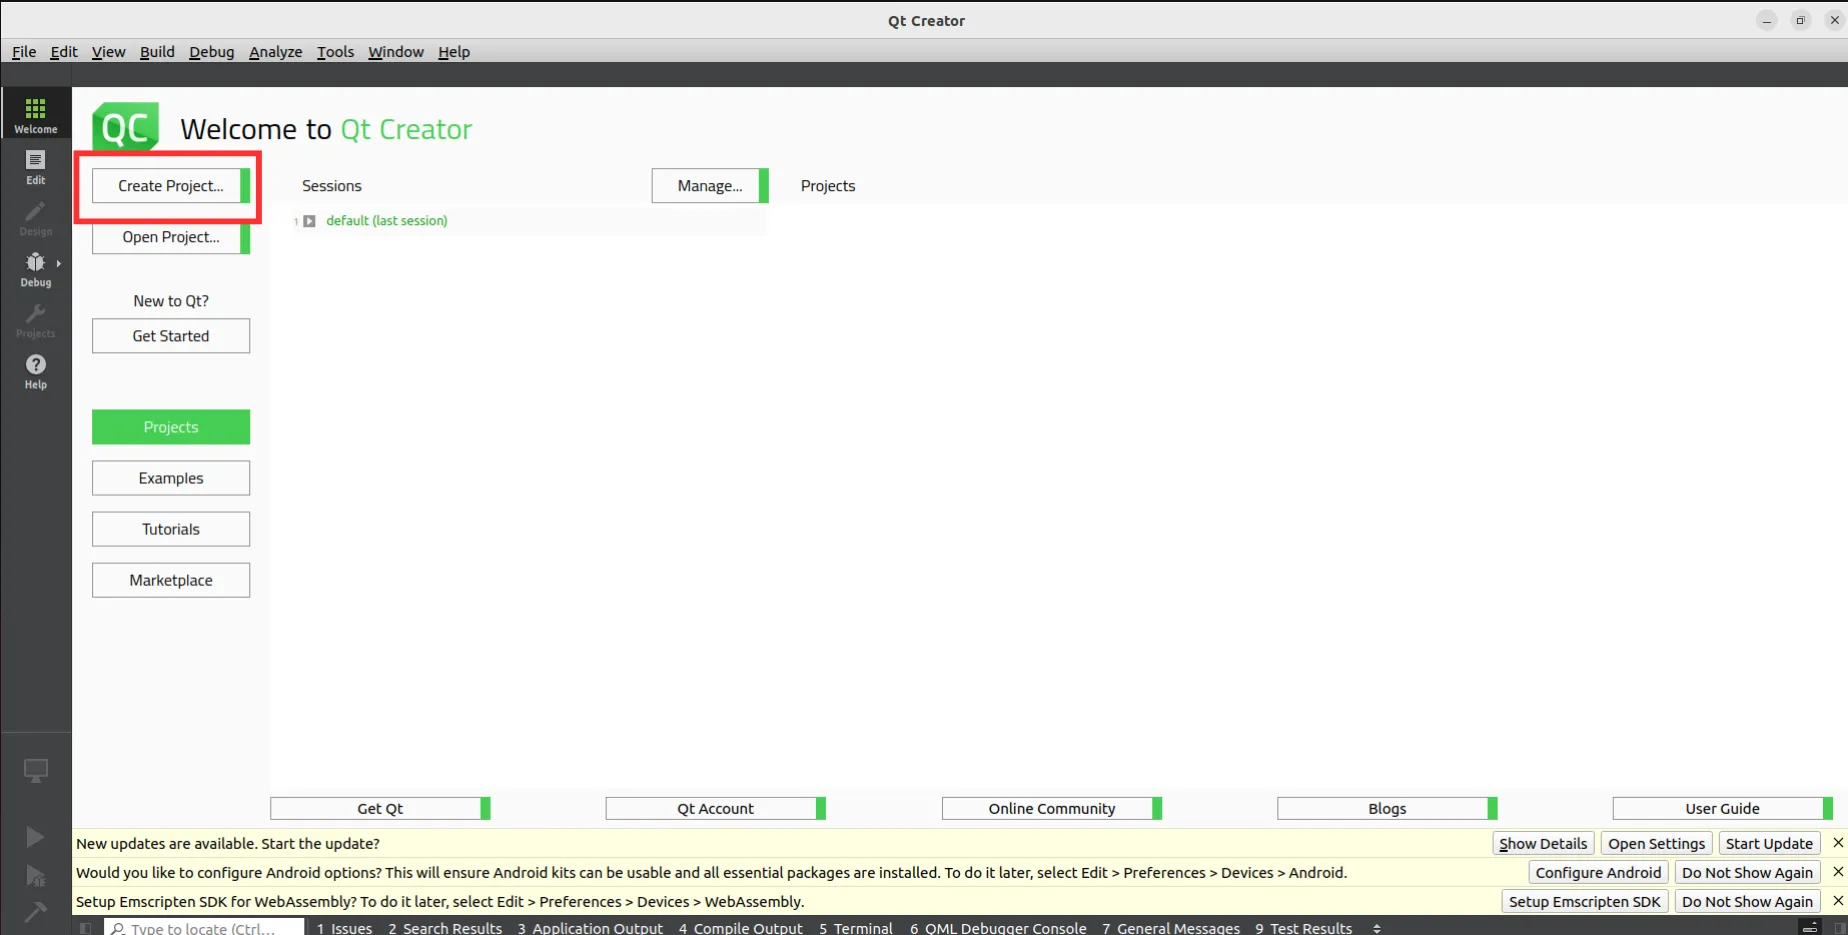
Creating a New Project
Section titled “Creating a New Project”To create a new project in Qt Creator:
- Select “Create Project” from the welcome screen or go to File → New File or Project → Application.
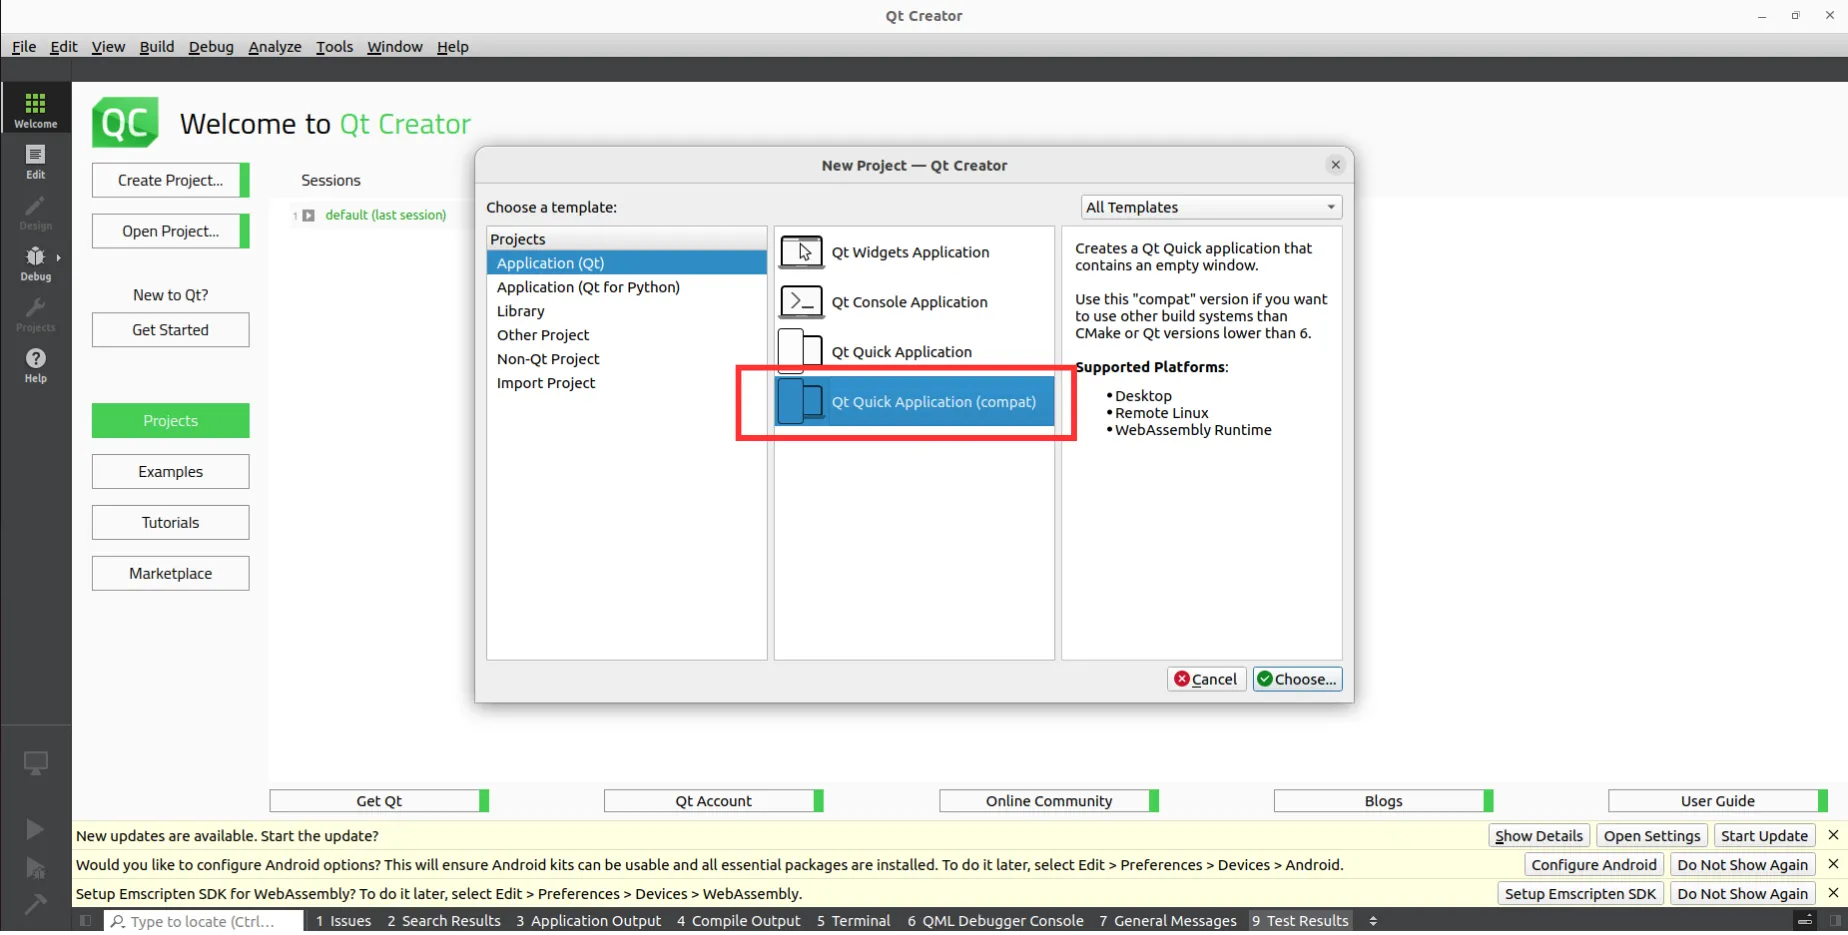
- Choose “Qt Quick Application - Empty (Compact)” to create a QML-based UI application.
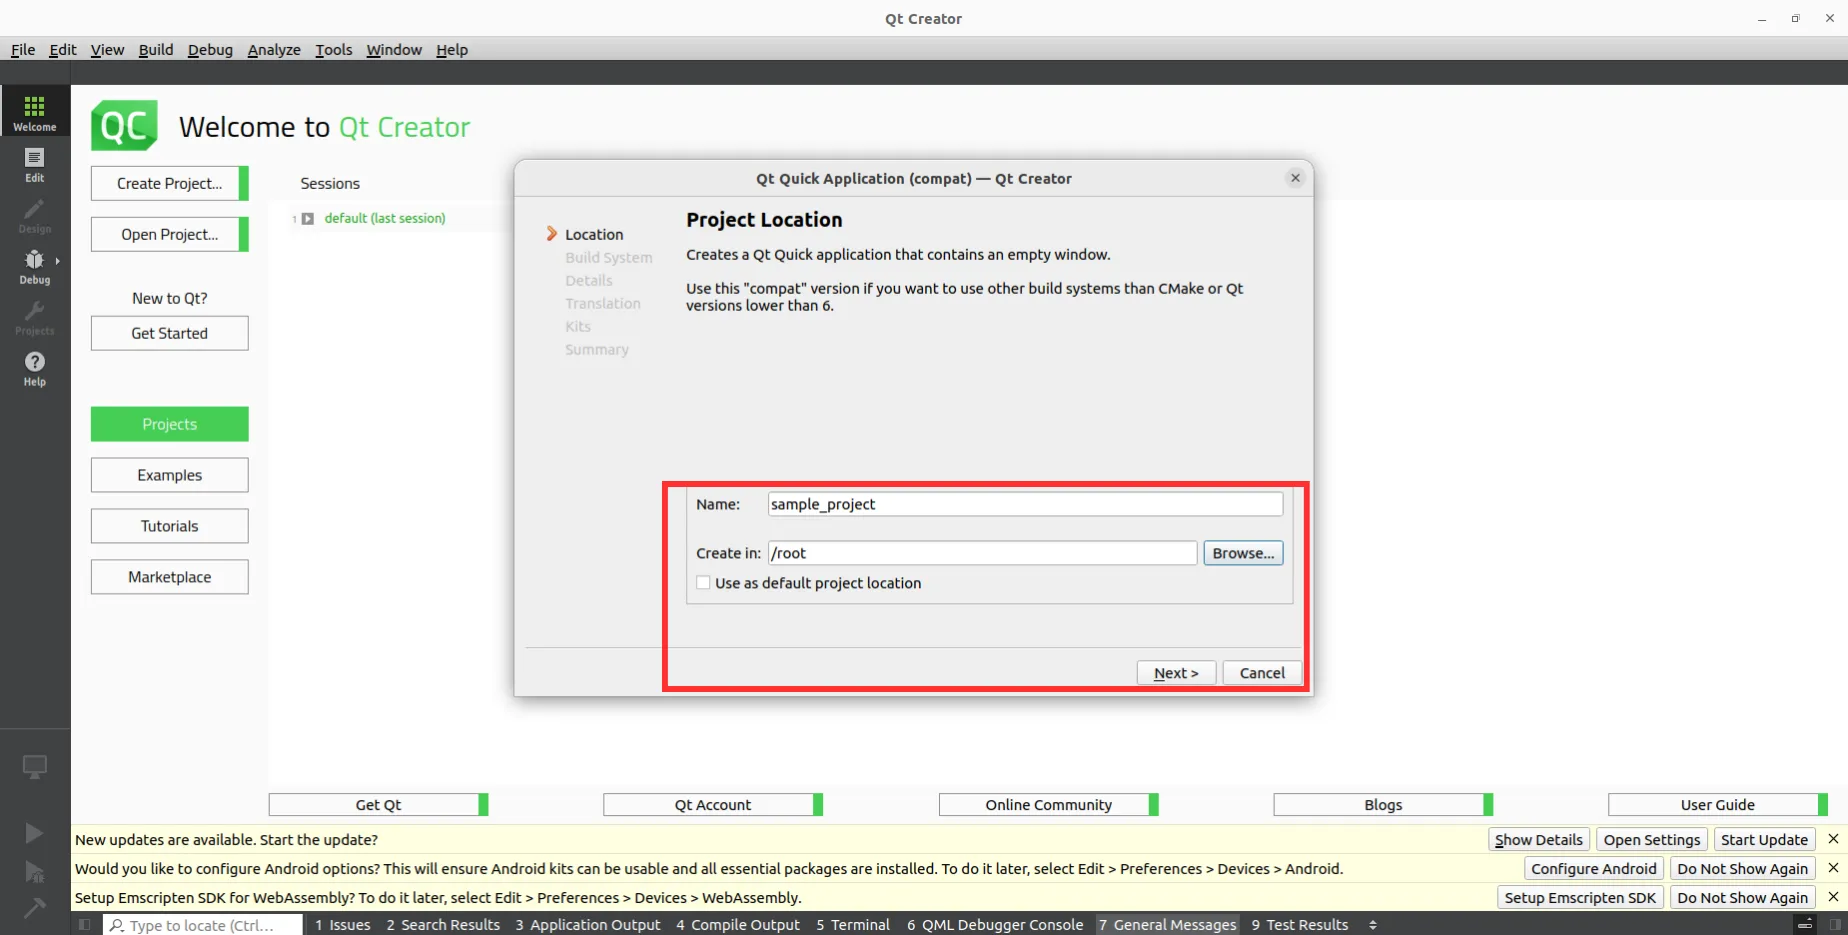
- Enter the project name and select the directory where the project should be created.
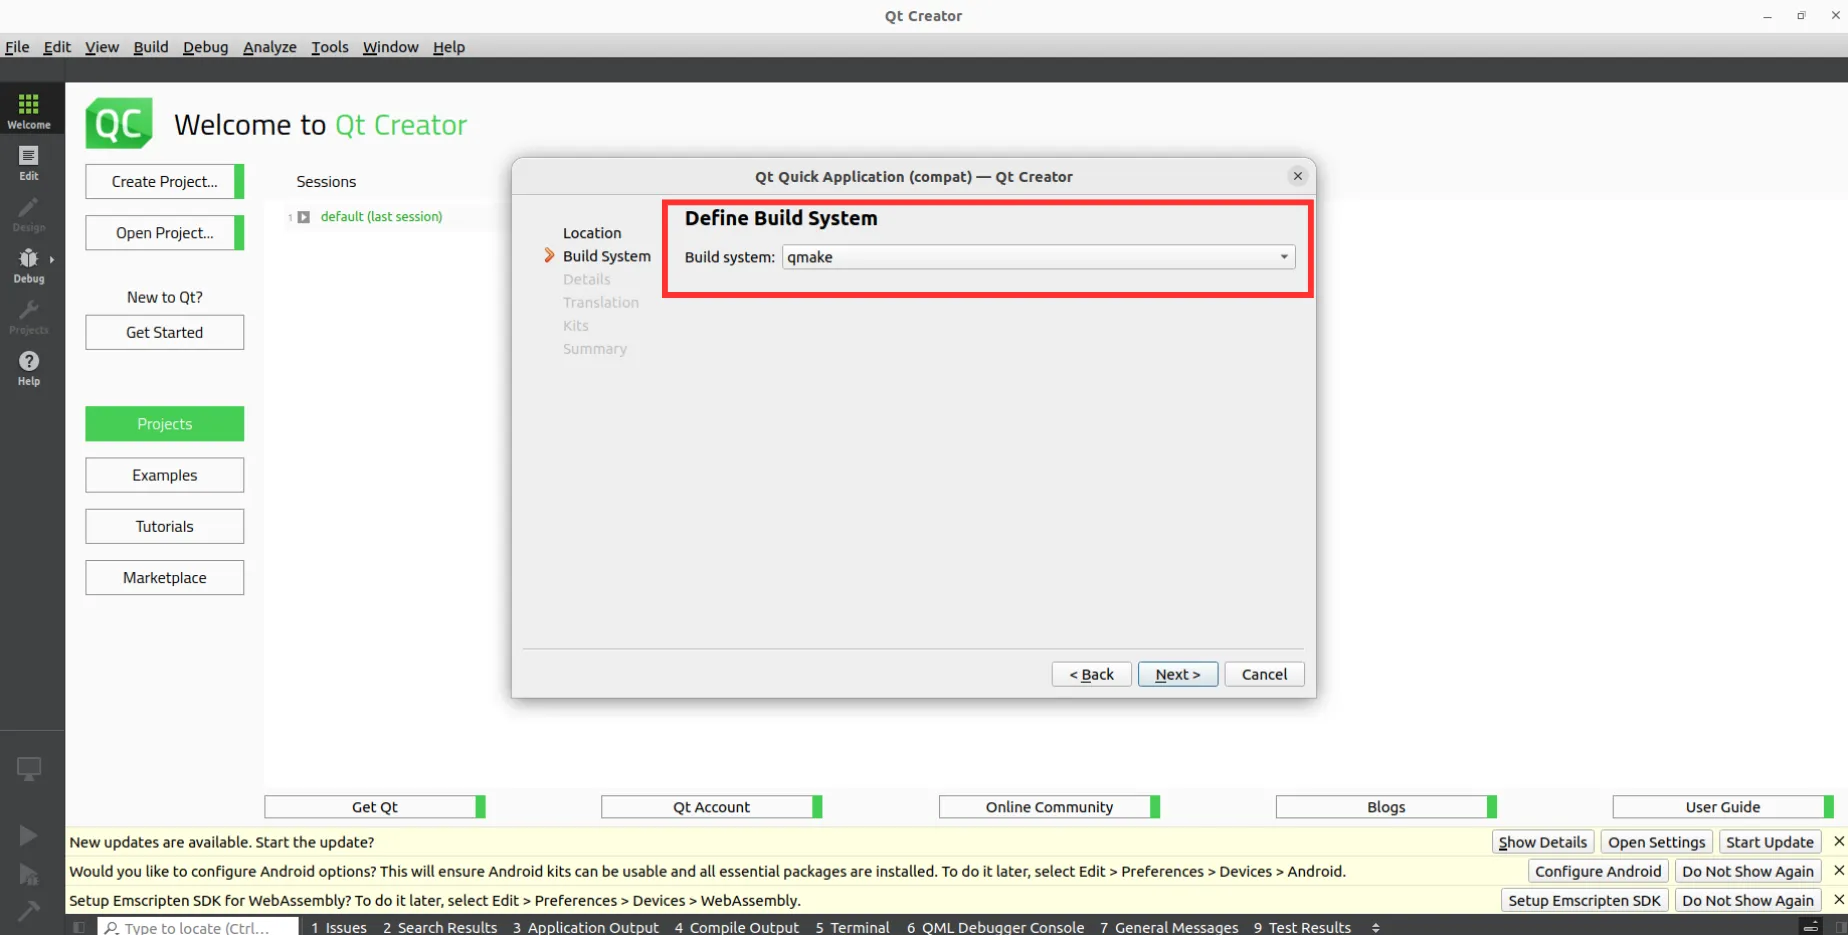
- In the Build System section, choose
qmake.
If you select CMake, you will need to manually update the provided module code.
:::
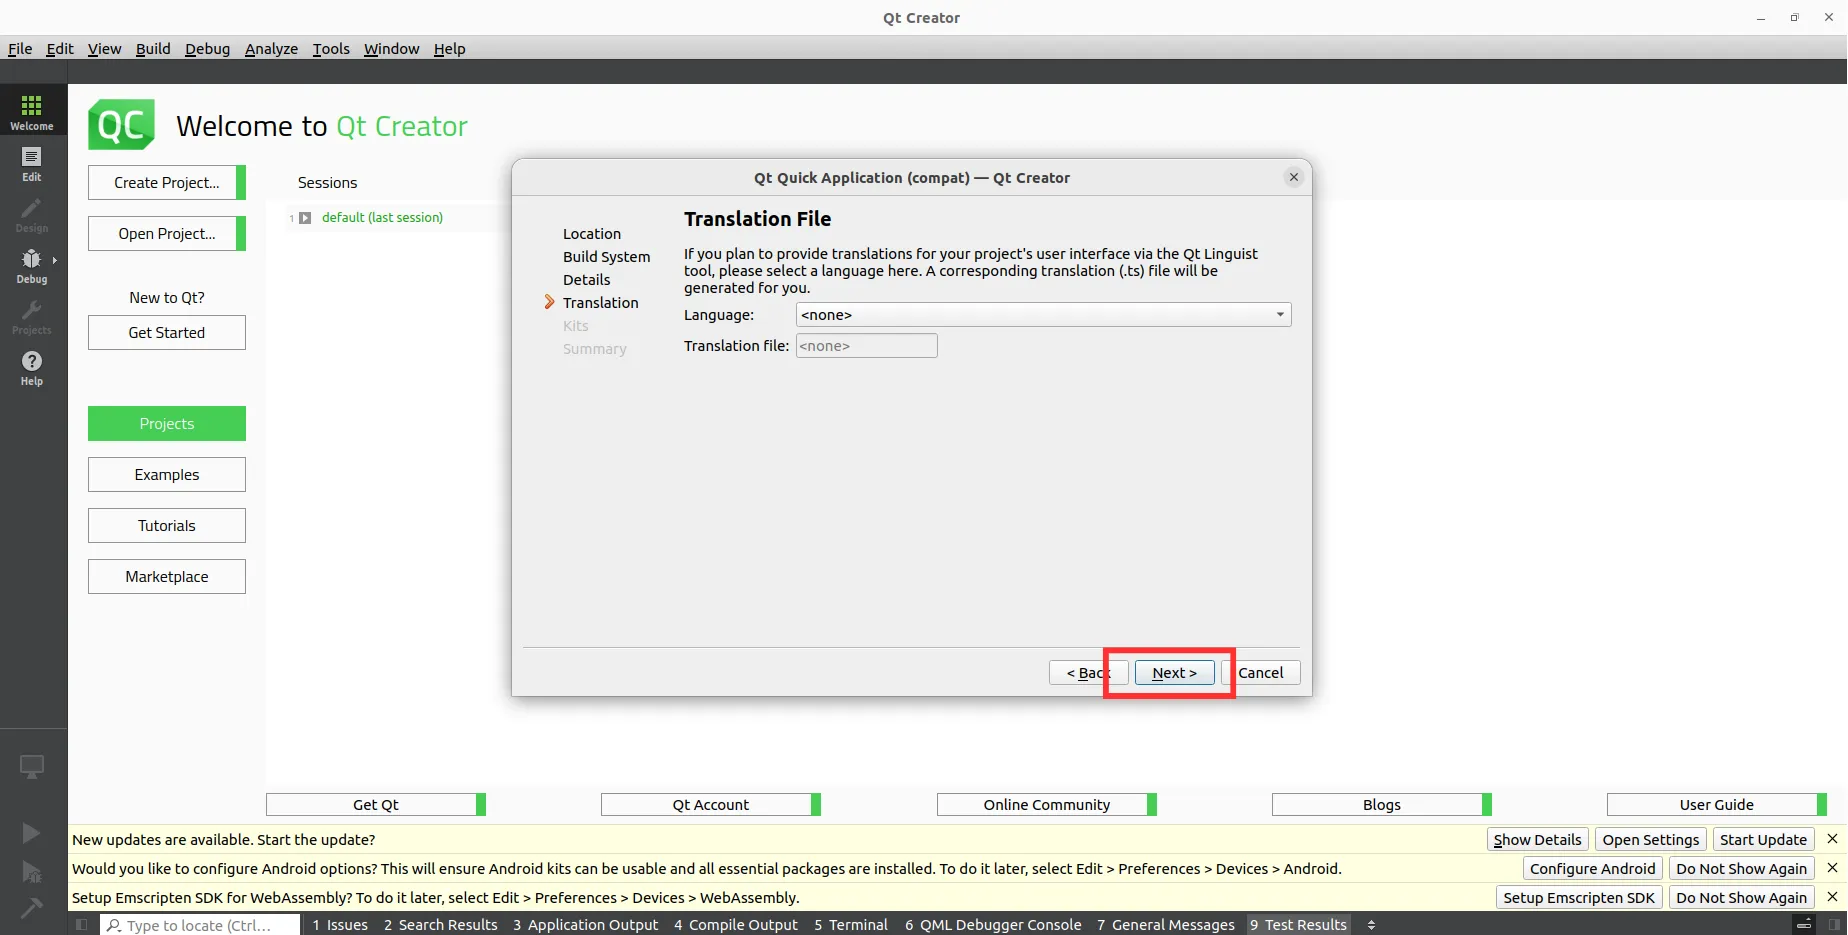
- The translation file allows you to add multilingual support to your application. You can define and manage translations using .ts files and Qt Linguist.
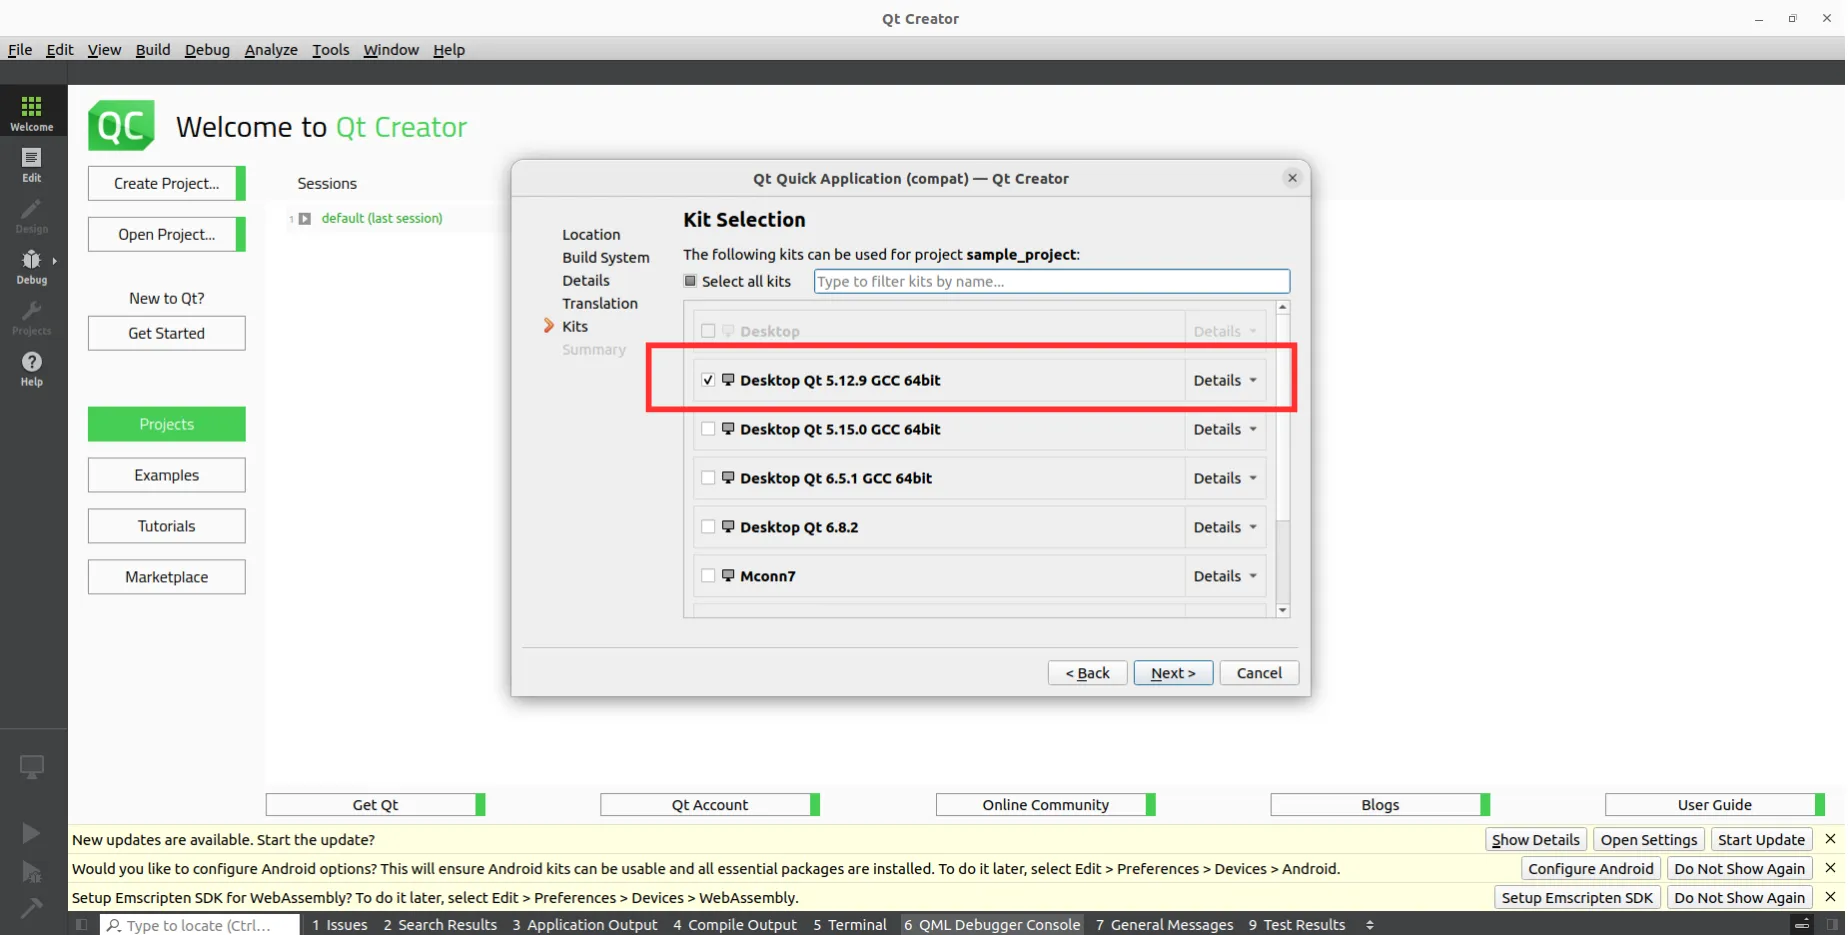
- In the Kits section:
- For Desktop development, select the Qt 5.12 Desktop kit.
- For MConn cross-compilation, select the MConn Qt 5.12 kit.
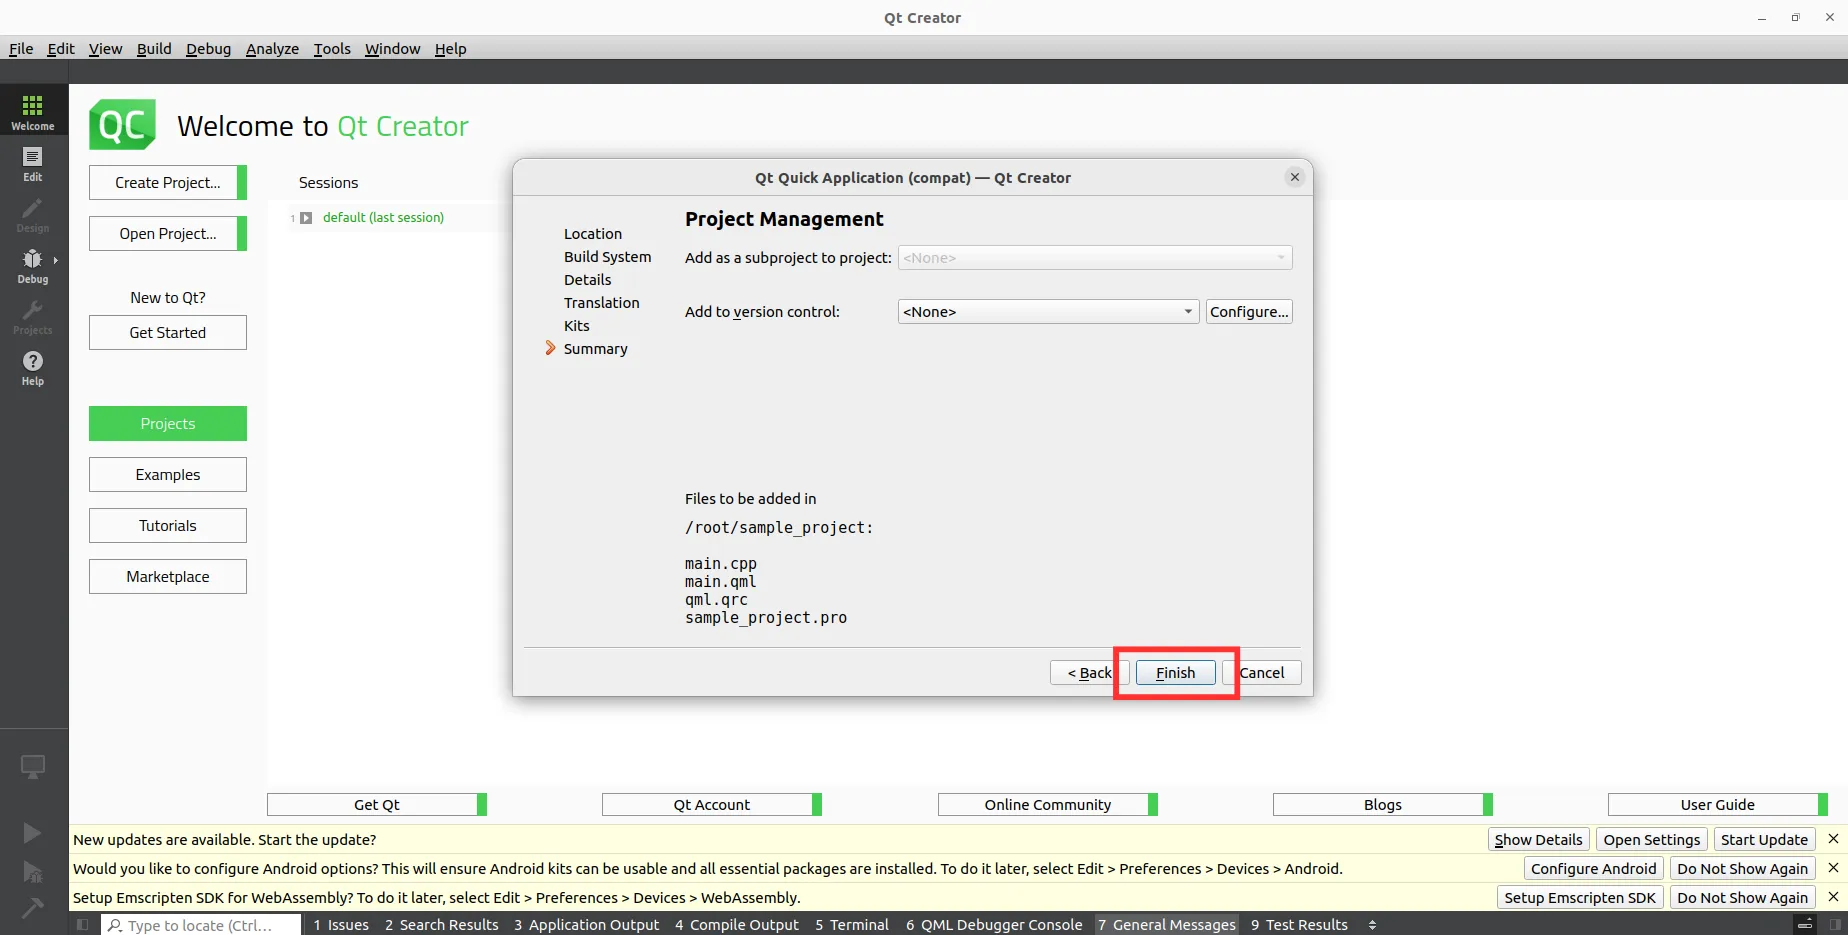
- In the Summary section, review your settings and click Finish to create the project.
Qt Core
Section titled “Qt Core”Qt provides functionality on top of C++, which makes day-to-day tasks relatively easier. A few of the core concepts in QT are as follows:
Default .pro file of QT Application
Section titled “Default .pro file of QT Application”This file defines your project’s configuration, including source files, modules, resources, and settings. A default .pro file for a QML-based Qt app may look like:
QT += quick
CONFIG += c++11
# The following define makes your compiler emit warnings if you use# any Qt feature that has been marked deprecated (the exact warnings# depend on your compiler). Refer to the documentation for the# deprecated API to know how to port your code away from it.DEFINES += QT_DEPRECATED_WARNINGS
# You can also make your code fail to compile if it uses deprecated APIs.# In order to do so, uncomment the following line.# You can also select to disable deprecated APIs only up to a certain version of Qt.#DEFINES += QT_DISABLE_DEPRECATED_BEFORE=0x060000    # disables all the APIs deprecated before Qt 6.0.0
SOURCES += \        main.cpp
RESOURCES += qml.qrc
# Additional import path used to resolve QML modules in Qt Creator's code modelQML_IMPORT_PATH =
# Additional import path used to resolve QML modules just for Qt Quick DesignerQML_DESIGNER_IMPORT_PATH =
# Default rules for deployment.qnx: target.path = /tmp/$${TARGET}/binelse: unix:!android: target.path = /opt/$${TARGET}/bin!isEmpty(target.path): INSTALLS += target
Let’s talk about each line in detail:
QT += quick
CONFIG += c++11
Includes the Qt Quick module for QML support.
Enables C++11 features. You can change this to c++17 or higher if required.
DEFINES += QT_DEPRECATED_WARNINGSShows compiler warnings when deprecated Qt features are used.
SOURCES += \    main.cpp
RESOURCES += \    qml.qrc
Adds the source code and resource files to be compiled.
qml.qrc contains embedded QML files and external assets like images, gifs, or videos.
QML_IMPORT_PATH =QML_DESIGNER_IMPORT_PATH =Optional paths used when including custom QML modules.
qnx: target.path = /tmp/$${TARGET}/binelse: unix:!android: target.path = /opt/$${TARGET}/bin!isEmpty(target.path): INSTALLS += targetDeployment path in target device for cross compilation For MConn, only /rw_data/ is available for write operation. Therefore You must change:
qnx: target.path = /tmp/$${TARGET}/binTo:
qnx: target.path = /rw_data/$${TARGET}/binDefault main.cpp of QT Application
Section titled “Default main.cpp of QT Application”#include <QGuiApplication>#include <QQmlApplicationEngine>
int main(int argc, char *argv[]){ QCoreApplication::setAttribute(Qt::AA_EnableHighDpiScaling);
QGuiApplication app(argc, argv);
QQmlApplicationEngine engine; const QUrl url(QStringLiteral("qrc:/main.qml")); QObject::connect(&engine, &QQmlApplicationEngine::objectCreated, &app, [url](QObject *obj, const QUrl &objUrl) { if (!obj && url == objUrl) QCoreApplication::exit(-1); }, Qt::QueuedConnection); engine.load(url);
return app.exec();}Let’s talk about each line in detail:
int main(int argc, char *argv[]){The main function is the application’s entry point. It takes the command-line arguments argc and argv as parameters.
QGuiApplication app(argc, argv);QGuiApplication is instantiated to manage the application’s graphical user interface (GUI) and related functionality.
QQmlApplicationEngine engine;QQmlApplicationEngine is created to handle the loading and execution of QML files.
const QUrl url(QStringLiteral("qrc:/main.qml"));The location of the QML file is specified using a QUrl. In this case, the QML file is assumed to be a resource file (qrc) named main.qml.
QObject::connect(&engine, &QQmlApplicationEngine::objectCreated, &app, [url](QObject *obj, const QUrl &objUrl) { if (!obj && url == objUrl) QCoreApplication::exit(-1); }, Qt::QueuedConnection);A connection is established to handle the QQmlApplicationEngine’s creation of objects. If object creation fails, the application exits with an error code -1.
engine.load(url);The load method is called to load the specified QML file into the QQmlApplicationEngine, which is the starting point of the UI application.
return app.exec();The exec method starts the event loop and executes the application. The program remains in the event loop until the application is closed.
main.qml – The QML Entry Point
Section titled “main.qml – The QML Entry Point”This file is the visual starting point of the application. A typical default main.qml might look like:
import QtQuick 2.15import QtQuick.Controls 2.15
ApplicationWindow {    visible: true    width: 640    height: 480    title: qsTr("Hello World")}
Let’s talk about each line in detail:
import QtQuick 2.15import QtQuick.Controls 2.15These import the Qt Quick UI types and standard UI controls like Button, ApplicationWindow, etc.
ApplicationWindow {} - This is the main window of the app. It manages the view and contains the GUI components.
visible: trueMakes the window visible.
width, height, titleSet the window’s dimensions and title.
qml.qrc – Qt Resource Collection File
Section titled “qml.qrc – Qt Resource Collection File”This file lists resources (like .qml, .png, .ttf, etc.) to bundle them inside the binary.
A simple qml.qrc looks like:
<RCC> <qresource prefix="/"> <file>main.qml</file> <!-- You can add more like --> <!-- <file>assets/logo.png</file> --> </qresource></RCC><RCC> and <qresource>
-
These tags define a resource collection used by the Qt Resource System.
prefix="/" -
This sets the virtual path prefix for all embedded resources.
-
Files added under this prefix can be accessed in QML or C++ using the path format:
QObject
Section titled “QObject”The backbone of the QT framework is the QObject class. It’s crucial because it includes key features like Q_SIGNALS, Q_SLOTS, Q_INVOKABLE, and Q_PROPERTY. To use these specific QT functionalities, a class needs to inherit from the QObject class using the public access specifier and include the Q_OBJECT macro at the start of the class body. This adds an extra step before the C++ compilation, known as meta-object compilation.
During this step, the moc tool looks at code with QObject inheritance and the Q_OBJECT macro, adding extra C++ code for Q_SIGNALS, Q_SLOTS, Q_PROPERTY, and more. So, if you want to use Qt-specific features, ensure your class includes QObject in its inheritance.
#include <QObject>class MyQtClass : public QObject { Q_OBJECTpublic: // Constructor MyQtClass(QObject* parent = nullptr) : QObject(parent) {}};Parent child relation
Section titled “Parent child relation”In Qt, the parent-child relationship is crucial for organizing objects and efficient memory management. When a QObject has a parent, the parent automatically handles the deletion of its children upon its deletion. This hierarchy also facilitates communication by propagating properties, signals, and slots. The parent takes ownership of its children, streamlining resource management in Qt applications.
QObject* parent = new QObject(); // Creating a parent objectQObject* child = new QObject(parent); // Creating a child object with'parent'delete parent; // Automatically deletes 'child' as wellSignal and Slot
Section titled “Signal and Slot”In any application, when an event occurs, and a class needs to inform other entities (such as classes or QML) about the event and any state changes, it uses a mechanism called signals and slots.
This is a loosely coupled system, meaning a class emits a signal regardless of whether the other class receives it. Classes that wish to be notified have special functions called slots, which connect to specific signals of specific objects. This forms a many-to-many relationship, allowing a particular signal to be connected to multiple slots and a specific slot to be connected to various signals.
In essence, a signal serves as a broadcast, informing interested parties about events fostering flexibility and modularity in the application’s design.
Signal
Section titled “Signal”Signals are accessible publicly and can be emitted from any location, though it’s advisable to emit them from the class defining the signal and its subclasses. When a signal is emitted, connected slots execute promptly, like regular function calls.
Significantly, this signals-and-slots mechanism operates independently of any GUI event loop. Following the emit statement, the code executes only after all connected slots have returned. The situation is slightly different when using queued connections; in such a case, the code following the emit keyword will continue immediately, and the slots will be executed later.
Additionally, signals can transmit data in the form of parameters, which can then be received at the slot side. If multiple slots are linked to a single signal, they execute sequentially in the order of connection when the signal is emitted. It’s important to note that signals are automatically generated by the moc (Meta-Object Compiler) and should not be implemented in the .cpp file.
A slot is called when a signal connected to it is emitted. Slots are normal C++ functions; their unique feature is that signals can be connected to them.
Since slots are normal member functions, they follow the standard C++ rules when called directly. However, as slots, they can be invoked by any component, regardless of its access level, via a signal-slot connection.
You can also define slots as virtual, which we have found quite helpful in practice.
#include <QObject>#include <QDebug>class Sender : public QObject { Q_OBJECTsignals: // Signal declaration void sendMessage(const QString& message);public: // Function to emit the signal void sendMessageSignal(const QString& message) { // Emitting the signal emit sendMessage(message); }};class Receiver : public QObject { Q_OBJECTpublic slots: // Slot to receive and display the message void displayMessage(const QString& message) { qDebug() << "Received message:" << message; }};int main() { // Creating instances of Sender and Receiver Sender sender; Receiver receiver; // Connecting the signal from Sender to the slot in Receiver QObject::connect(&sender, SIGNAL(sendMessage(QString)), &receiver,SLOT(displayMessage(QString))); // Emitting the signal from within Sender sender.sendMessageSignal("Hello, World!"); return 0;}QProperty
Section titled “QProperty”Qt provides a flexible property system similar to those found in specific compilers. It is built on the Meta-Object System, which enables inter-object communication through signals and slots. The main purpose of QProperty is to create dynamic, bindable data fields for use in the front end, particularly in QML. Any changes made to these properties are automatically reflected in the front end and vice versa, ensuring synchronization between the front end and back end.
The Q_PROPERTY macro is used to define a QProperty, specifying the following details:
- Data type of the property.
- Property name.
- C++ getter function reference in the
READmacro. - C++ setter function reference in the
WRITEmacro. - A signal reference emitted from the setter, indicating a change in the data field, specified in the
NOTIFYmacro.
Apart from these, there are various other functionalities, refer to the documentation for further details.
#include <QObject>#include <QDebug>class MyObject : public QObject { Q_OBJECT Q_PROPERTY(QString name READ getName WRITE setName NOTIFY nameChanged)public: // Constructor MyObject(QObject* parent = nullptr) : QObject(parent),m_name("DefaultName") {} // Getter QString getName() const { return m_name; } // Setter void setName(const QString& name) { if (name != m_name) { m_name = name; emit nameChanged(m_name); } }signals: // Signal emitted when the name property changes void nameChanged(const QString& newName);private: QString m_name;};
int main() { // other code of main MyObject myObj; // Exposing the instance to QML engine.rootContext()->setContextProperty("myObject", &myObj); myObj.setName("NewName"); return 0;}
In QML:
import QtQuick 2.15import QtQuick.Controls 2.15ApplicationWindow { visible: true width: 640 height: 480 Text { id :valueFromBackend anchors.centerIn: parent text: myObject.name // binding with class property name , whenever thisproperty changes in backend , this text also changes accordingly }}Q_INVOKABLE
Section titled “Q_INVOKABLE”To enable the invocation of class member functions from the front end (QML), it is necessary to designate them as invokable by adding the Q_INVOKABLE macro before the function’s return type. This step ensures that these functions can be called from the UI through the meta-object system. It is essential to place these functions in the public scope, inherit the class from QObject, and include the Q_OBJECT macro to facilitate the integration with the meta-object system.
Class with Q_INVOKABLE function:
class MessageProvider : public QObject { Q_OBJECTpublic: Q_INVOKABLE void displayHelloWorld() { qDebug() << "Hello, World!"; }};vClass exposed to front end with setContextProperty:
MessageProvider messageProvider;// Exposing the MessageProvider instance as a context propertyengine.rootContext()->setContextProperty("myMessageProvider",&messageProvider);Call function from front end:
import QtQuick 2.15import QtQuick.Controls 2.15ApplicationWindow { visible: true width: 640 height: 480 Button { text: "Say Hello" onClicked: { // Calling the Q_INVOKABLE function from QML myMessageProvider.displayHelloWorld(); } }}Mechanism to expose Classes from backend to frontend
Section titled “Mechanism to expose Classes from backend to frontend”SetContextProperty and qmlRegisterType are mechanisms in the Qt framework that make C++ objects accessible to QML. They play different roles in connecting C++ and QML components.
setContextProperty
Section titled “setContextProperty”setContextProperty is used to expose instances of C++ objects to the QML context. It allows you to make an instance of a C++ class directly available as a context property in QML, making it accessible to QML components. Let’s investigate its example: In C++:
QQmlApplicationEngine engine;// Creating an instance of MyClassMyClass myObject;// Exposing the instance to QMLengine.rootContext()->setContextProperty("myObject", &myObject);In QML:
// Now, 'myObject' is accessible in QMLmyObject.someFunction();qmlRegisterType
Section titled “qmlRegisterType”qmlRegisterType is used to register C++ classes as QML types. This allows you to directly create instances of those classes in QML, treating them as QML components. This is particularly useful when you want to instantiate and use C++ classes in QML without creating instances in C++ code.
In C++:
class MyClass : public QObject { Q_OBJECTpublic: Q_INVOKABLE void someFunction();};// MyClass.cpp// Implementation of someFunction// Registering MyClass as a QML typeqmlRegisterType<MyClass>("MyNamespace", 1, 0, "MyClass");In QML:
// Now, 'MyClass' can be used as a QML typeMyClass { id: myObject}// Accessing functions or properties of 'myObject'myObject.someFunction();QT Quick Application
Section titled “QT Quick Application”QML is a declarative language that describes user interfaces in terms of their visual components and how they interact and relate to one another. It is a highly human-readable language designed to enable components to be interconnected dynamically and allow components to be easily reused and customized within a user interface. Using the QtQuick module, designers and developers can easily build fluid animated user interfaces in QML and have the option of connecting these user interfaces to back-end C++ logic.
Syntax
Section titled “Syntax”QML (Qt Meta-Object Language) is a declarative language designed to create user interfaces in Qt applications. It employs a hierarchical tree structure with a single root element typically representing the application window. The syntax follows a block structure, encapsulating each element within curly braces . These elements establish a parent-child relationship, defining the layout and composition of the user interface.
The properties of QML elements define their appearance, position, and behavior. The syntax for setting these properties is structured as “property name: value.” This enables precise control over the user interface’s visual attributes and dynamic aspects.
Beyond visual aspects, QML also integrates JavaScript to implement GUI logic, handle events, and perform other dynamic behaviors. This declarative syntax and imperative JavaScript combined allow for a comprehensive and expressive approach to designing responsive and interactive user interfaces in Qt applications. As a result, QML serves as a powerful tool for developers, providing both a clear structure for UI design and the flexibility of a complete programming language for handling complex logic and user interactions.
ApplicationWindow
Section titled “ApplicationWindow”The ApplicationWindow element is the primary container for the main window in Qt Quick applications. It encapsulates the overall user interface and provides a structured approach to window definition.
Properties:
title: Specifies the title of the application window.widthandheight: Define the dimensions of the window.visible: Determines the initial visibility state of the window.- `color“: Sets the background color of the window.
Example:
ApplicationWindow { visible: true width: 400 height: 300 title: "My Application"}Window
Section titled “Window”The Window type represents a versatile window within a Qt Quick application, suitable for creating standalone windows or pop-up dialogs.
Properties:
title: Sets the title of the window.widthand height`: Specify the dimensions of the window.visible: Controls the initial visibility state.color: Defines the background color of the window.
Example:
Window { visible: true width: 200 height: 150 title: "Pop-up Window"}The Item element is a fundamental building block in QML, serving as a versatile container for graphical elements within Qt Quick applications. It does not have a visible appearance but provides a space to contain and organize other QML elements.
Properties:
widthandheight: Define the dimensions of the item.visible: Controls the initial visibility state of the item.opacity: Specifies the transparency of the item, ranging from 0 (completely transparent) to 1 (fully opaque).rotation: Sets the rotation angle of the item in degrees.
Example:
Item { width: 300 height: 200 visible: true opacity: 0.8 rotation: 45}Rectangle
Section titled “Rectangle”The Rectangle element is a fundamental graphical primitive in QML. It provides a rectangular shape that can be used for visual representation and layout within Qt Quick applications.
Properties:
widthandheight: Define the dimensions of the rectangle.color: Sets the fill color of the rectangle.border.colorandborder.width: Specify the color and width of the rectangle’s border.radius: Sets the corner radius, giving the rectangle rounded corners.
Example:
Rectangle { width: 200 height: 150 color: "lightblue" border.color: "darkblue" border.width: 2 radius: 10}The Image element in QML is designed to display images within Qt Quick applications. It allows developers to incorporate visual content such as PNGs, JPEGs, or other supported image formats into the user interface.
Properties:
source: Specifies the path or URL of the image file.widthandheight: Define the dimensions of the image.fillMode: Determines how the image should be scaled and positioned within its item.asynchronous: Controls whether the loading of the image should be asynchronous.
Example:
Image { source: "images/sample.jpg" width: 300 height: 200 fillMode: Image.PreserveAspectFit}QML Controls
Section titled “QML Controls”MouseArea
Section titled “MouseArea”The MouseArea element in QML handles mouse events for a designated region within a Qt Quick application. It enables developers to define interactive areas that respond to user input, such as clicks, releases, and movement.
Properties:
anchors: Specifies the position and size of the MouseArea within its parent item.onClicked,onPressed,onReleased, etc.: Signal handlers that respond to specific mouse events.enabled: Controls whether the MouseArea responds to user input.drag.target: Specifies an item to be moved or dragged when the user interacts with the MouseArea.
For further details about MouseArea, consult the official Qt documentation.
Example QML:
Rectangle { width: 200 height: 150 MouseArea { anchors.fill: parent onClicked: { console.log("Mouse Clicked!") // Additional logic can be added here } }}Button
Section titled “Button”The button element in QML is a specialized user interface component designed to respond to user clicks or touches. It provides a convenient way to create interactive buttons within a Qt Quick application.
Properties:
text: Specifies the text displayed on the button.enabled: Controls whether the button responds to user input.onClicked: Signal handler that responds to the button being clicked.checkableandchecked: Allows the button to be in a toggled state, useful for actions like toggle buttons.
Example:
import QtQuick.Controls 2.15Button { text: "Click Me" onClicked: { console.log("Button Clicked!") // Additional logic can be added here }}Switch
Section titled “Switch”The Switch element in QML provides a user-friendly way to toggle between two states, typically representing an on/off or enabled/disabled scenario. Users can interactively change the state by dragging the switch handle.
Properties:
checked: Indicates the current state of the switch (true for on/checked, false for off/unchecked).onCheckedChanged: Signal handler that responds to changes in the switch state.activeFocusOnPress: Determines whether the switch gains focus when pressed.label: Specifies an optional label associated with the switch.
Example:
import QtQuick.Controls 2.15Switch { text: "Enable Feature" onCheckedChanged: { console.log("Switch state changed:", checked) // Additional logic can be added here }}Slider
Section titled “Slider”Slider elements in QML are graphical controls that allow users to select a numeric value within a specified range. They provide a visual representation of the selected value and support both horizontal and vertical orientations.
Properties:
value: Represents the current position or selected value on the slider.minimumValueandmaximumValue: Define the range within which the slider operates.stepSize: Specifies the increment or decrement value when the slider is moved.onValueChanged: Signal handler that responds to changes in the slider’s value.
Example:
import QtQuick.Controls 2.15Slider { width: 200 from: 0 to: 100 value: 50 stepSize: 5 onValueChanged: { console.log("Slider value changed:", value) // Additional logic can be added here }}ProgressBar
Section titled “ProgressBar”ProgressBar elements in QML provide a visual representation of the progress of a task or operation. They are useful for indicating the completion status of a process and giving users a sense of how much work has been done or remains.
Properties:
value: Represents the current progress value, typically a percentage.minimumValueandmaximumValue: Define the range within which the progress bar operates.visible: Controls the visibility of the progress bar.onValueChanged: Signal handler that responds to changes in the progress value.
Example:
import QtQuick.Controls 2.15ProgressBar { width: 200 from: 0 to: 100 value: 50 onValueChanged: { console.log("Progress value changed:", value) // Additional logic can be added here }}